on
说说单元测试
今天的主题是单元测试。
说实话最开始我对单元测试一无所知,以至于我觉得单元测试“没什么用”。
今天就来
什么是单元测试
来自wikipedia的定义:
In computer programming, unit testing is a software testing method by which individual units of source code are tested to determine whether they are fit for use.
简单翻译一下:
在计算机编程中,单元测试是一种通过源代码各个独立单元被测试,以验证它们是否能正确使用的软件测试方法。
单元测试中的单元指什么?
其实,对单元的定义取决于自己。
如果你想测试一个通用的工具函数,那么这个函数就是一个单元
如果想测试一个公共组件,可以把里面的一个功能函数当作单元,也可以把组件本身当成一个单元
大白话解释一下:
单测是测试某块代码(单元)能否“输出正常结果”的一种测试方式。
单元测试到底是为了什么而存在
可能会有一个很普遍的想法:
单元测试好费时间啊
不能否认编写单测确实会占用部分时间,但是
没有完备的单元测试的代码所构成的⼀个系统,就像组装⼀架飞机,各个配件没有分别经过严格检验,只在最后组装好后,再通过试飞来检验飞机是否正常⼀样。
来试着写几条单测
准备工作
- 首先,在想要写单测的目录下,新建__test__文件夹
- 然后,在__test__文件夹中添加index.test.ts(x)文件
- 最后,开始编写单测
├── ...
├── src
│   └── components
│       └── YourComponent
│           └── __test__
│               └── __snapshots__ // 运行 npm run test 自动生成的快照文件夹
│               │   └── index.test.tsx.snap // 运行 npm run test 自动生成的快照文件
│               └── index.test.tsx // 你需要编写单测的地方
├── ...
开始编写
举一些例子,但是不够全面
比如要测试一个函数运行的结果是否正确
test('urlToList', () => {
  const a = urlParse('/salaryManage/personalIncomeTaxReport?taxBelong=2021-09');
  // 判断function的返回结果和预期一致
  expect(a).toEqual({ taxBelong: '2021-09' });
});
要测试一个按钮正常的渲染
test('render correct', () => {
  const wrapper = mount(<Button>test</Button>);
  // 渲染button和snapshot相比较判断组件是否正常渲染
  expect(toJson(wrapper)).toMatchSnapshot();
});
要测试一个按钮的事件
  test('columnResize - auto', () => {
    const wrapper = mount(
      <NewTable
        rowKey="id"
        tableId="columnResize-auto"
        columnResizeEnabled
        columnResizeMinWidth={70}
        height={300}
        width={300}
        tableAdaptMode="auto"
        headers={scrollColumns}
        rows={data}
      />,
      {
        attachTo: document.getElementById('newTableContainer'),
      }
    );
    const dragTrigger = wrapper
      .find('#sd-columnResize-auto')
      .find('.sdTableContainer')
      .find('.sdTableHeaderContainer')
      .childAt(1)
      .childAt(0);

    dragTrigger.simulate('mousedown', { clientX: 300 });
    window.dispatchEvent(new MouseEvent('mousemove'));
    window.dispatchEvent(new MouseEvent('mouseup'));
    dragTrigger.props().onResize(1, 30);
    expect(
      wrapper
        .find('#sd-columnResize-auto')
        .find('.sdTableContainer')
        .find('.sdTableHeaderContainer')
        .childAt(1)
        .childAt(0)
        .exists('.sdDragTrigger')
    ).toBe(true);
  });
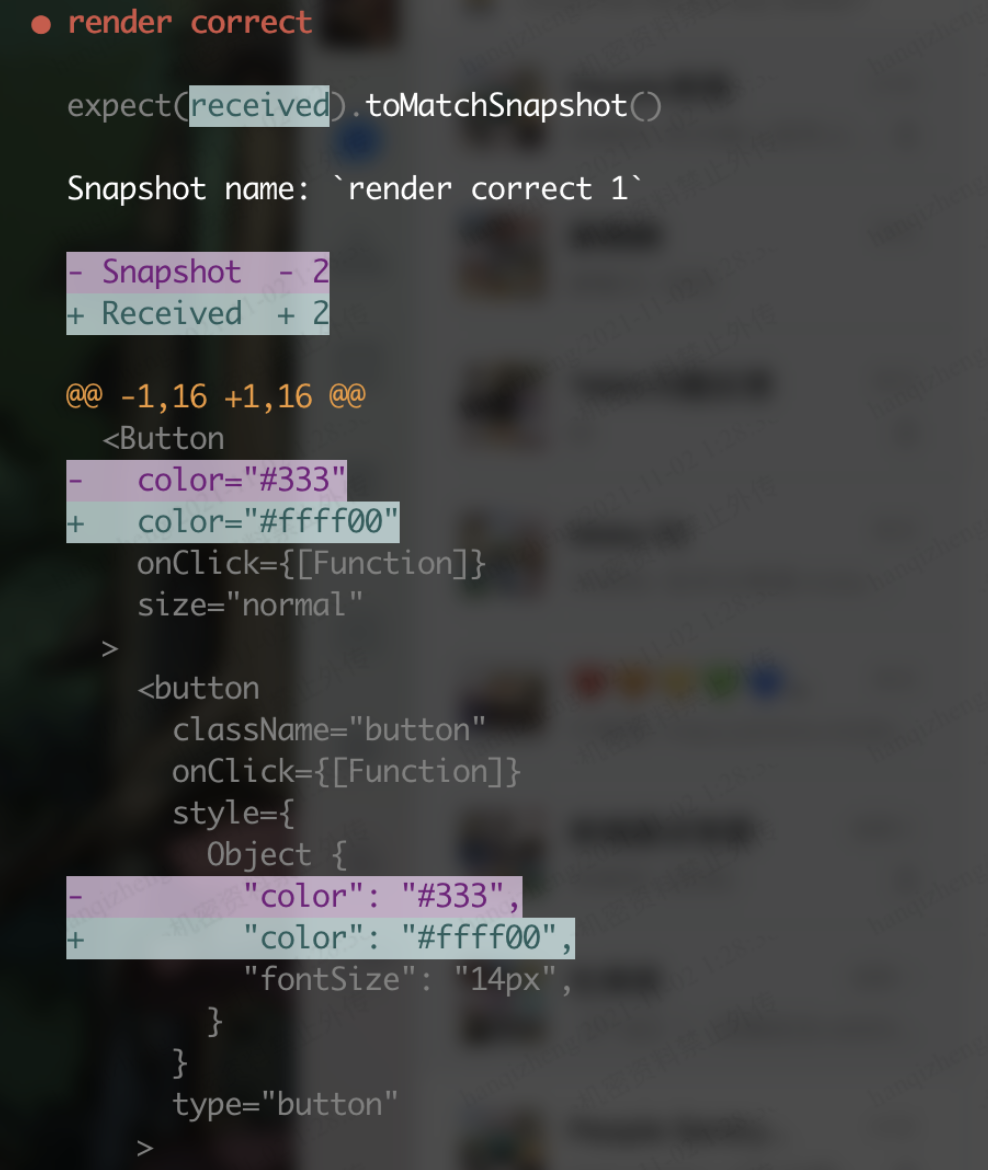
什么是快照(snapshot)
是一个很有用的东西
在给组件写单元测试的时候,会保留确切那一次组件渲染的快照(包括传参之类的)
每次运行单测都会生成一份快照去和保留的那次快照做对比,快照是不会自动跟随每次单测的执行而更新的
如果在后续修改单测的代码,改动了某个传参,或者在修改某个问题改动了组件中用于渲染的某个值,那么,生成的快照与原先快照做对比就会产生冲突
防止了一些UI不会有意外的改动被忽略。
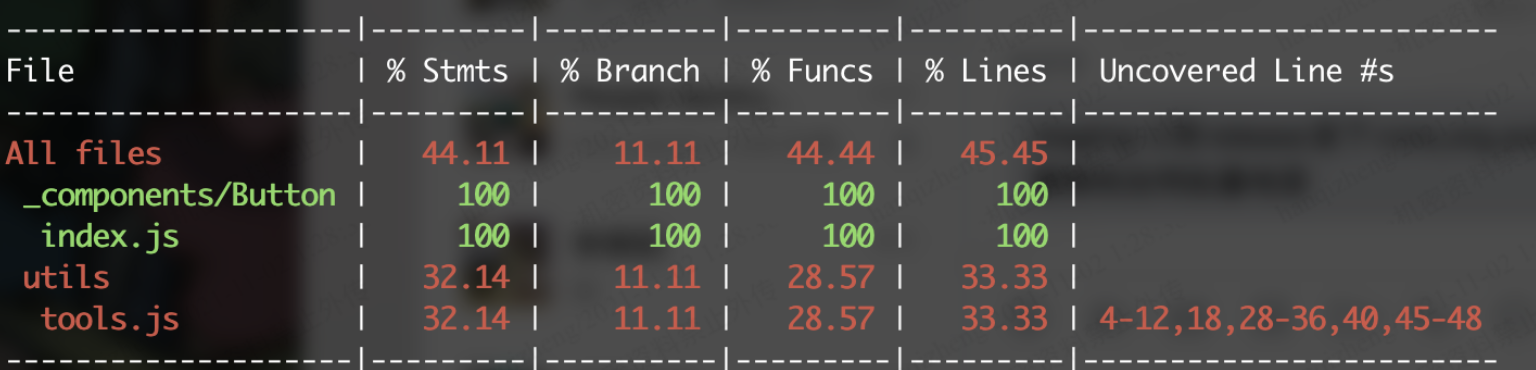
覆盖率
可以通过命令
$ npm run coverage
单测Q&A
it 和 test 有什么区别?
答案是没有区别。

document.querySelector()方法返回值都是null
因为mount这个方法并没有把组件渲染到document上,所以说需要我们通过配置mount的第二个参数attachTo来控制将组件渲染到哪里。

我们可以通过渲染一个div,让渲染的组件都attachTo到这个div而不是直接挂到document.body
在index.test.ts的顶部给出一个beforeEach方法,里面去生成一个div
beforeEach(() => {
  const div = document.createElement('div');
  div.setAttribute('id', 'newTableContainer');
  document.body.appendChild(div);
});
Element.getBoundingClientRect方法没有实现
目前所找到的方法只有在beforeEach中自己摸你实现一个getBoundingClientRect
beforeEach(() => {
  Element.prototype.getBoundingClientRect = jest.fn(() => {
    return {
      width: 300,
      height: 500,
      top: 0,
      left: 0,
      bottom: 0,
      right: 0,
      x: 0,
      y: 0,
      toJSON: () => {},
    };
  });
});